How to Automate Siemens NX: Recording Journals & Scripts
If you find yourself repeatedly executing the exact same series of menu clicks day in and day out—such as toggling background scenes, resetting rendering preferences, or running complex geometry checks—it's time to leverage NX Journaling.
In Siemens NX, any action you perform in the user interface can be recorded as a background script (written in C#, Visual Basic, or Python). By binding these recorded journals directly to custom buttons on your ribbon bar, you can transform multi-step operations into a single click.
Whether you are a CAD administrator setting up enterprise deployment roles or an individual power user looking to optimize your workspace, here is your step-by-step guide to recording journals and creating custom executable buttons in Siemens NX.
Watch the Video!
Step 1: Activate the Developer Ribbon Tab
By default, the automation tools in NX are hidden from the standard modeling interface to keep the UI clean.
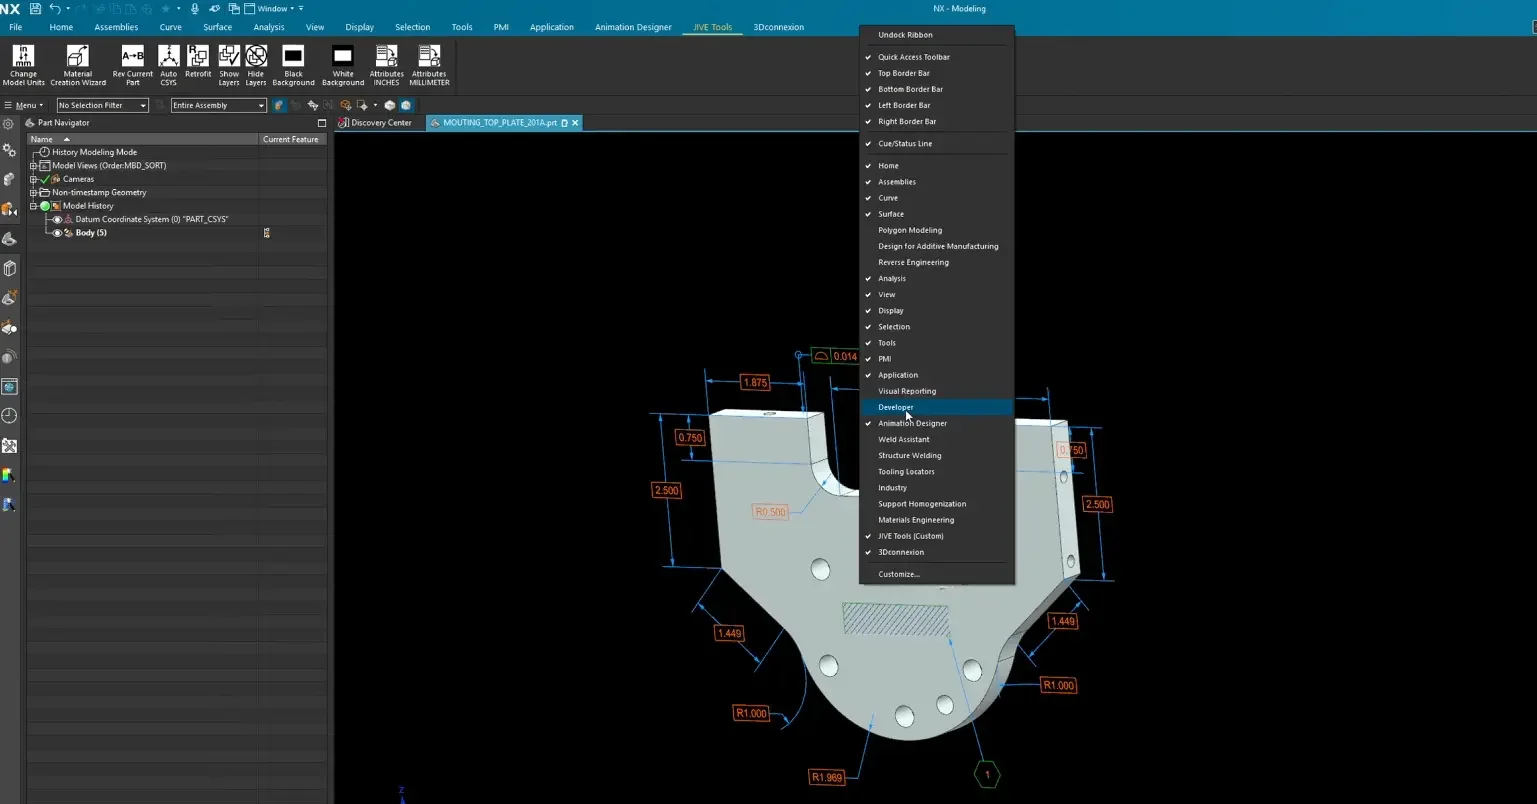
Right-click on any empty blue region of the top ribbon bar.
In the contextual menu, scroll down and check the box for Developer.
A new Developer tab will immediately appear on your ribbon, containing tools for code execution, debugging, and macro recording.
Step 2: Record Your Actions as an NX Journal
The Record feature acts as a macro recorder, translating every click and preference shift into clean, executable code behind the scenes.
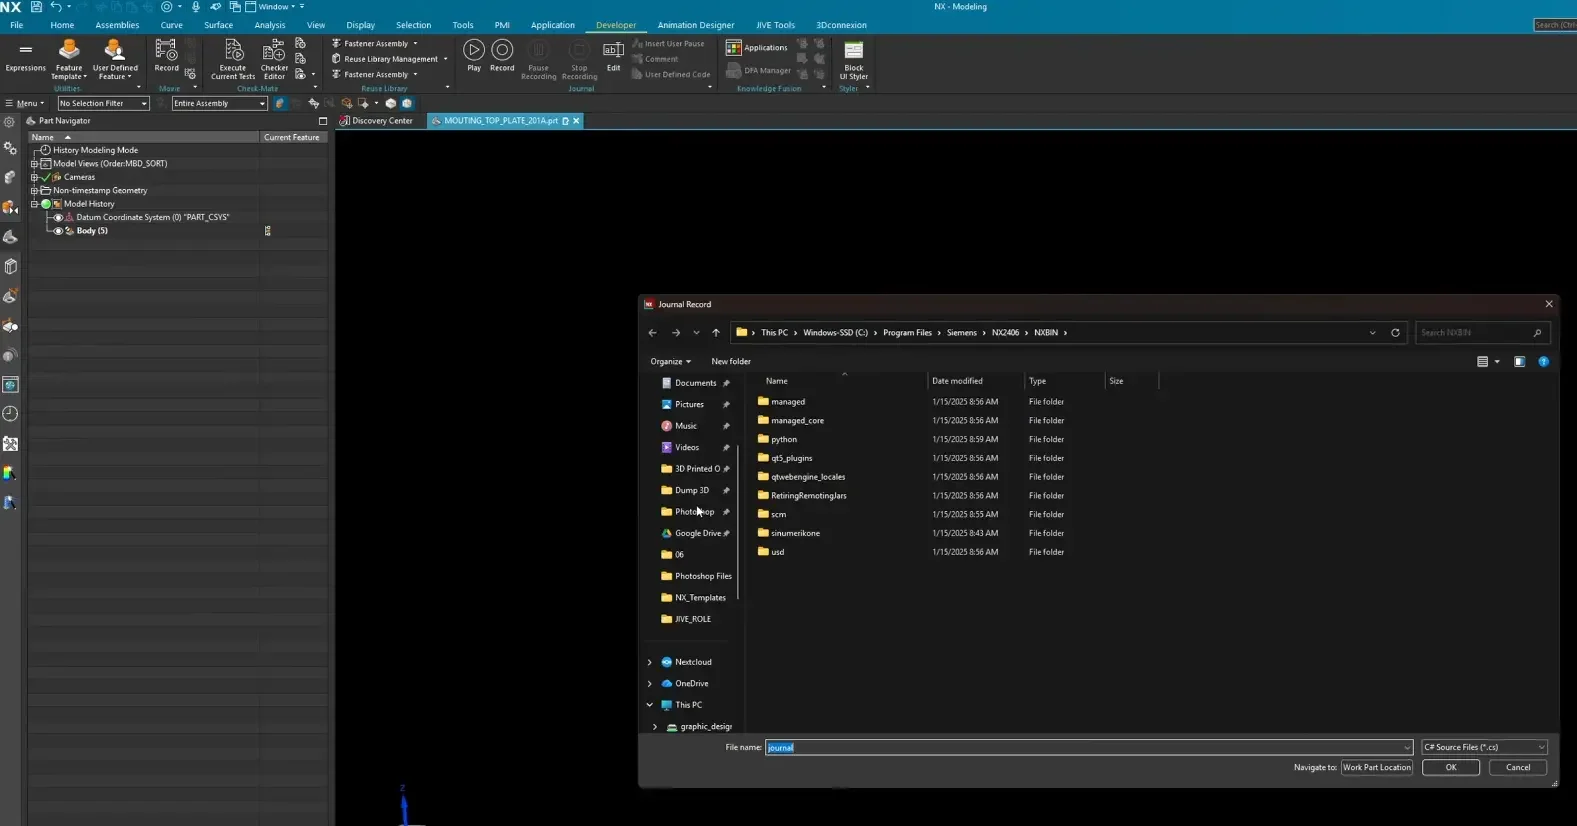
Open the Developer tab and click Record.
NX will prompt a warning dialog letting you know that certain non-standard commands may not record. Click OK.
Choose a destination folder on your machine (e.g., your Desktop) and name your file (e.g., pink_background.cs). Click OK.
Perform the exact sequence of actions you want to automate. For example:
Go to File > Scene.
Change the background fill type to Plain.
Select your custom color block and click OK.
Return to the Developer tab ribbon and click Stop Recording.
NX has now compiled your sequence into an associative C# script file saved on your hard drive.
Step 3: Configure a Custom Ribbon Tab and User Command
Now that we have an executable script file, we need a physical button in the Siemens NX interface to host it.
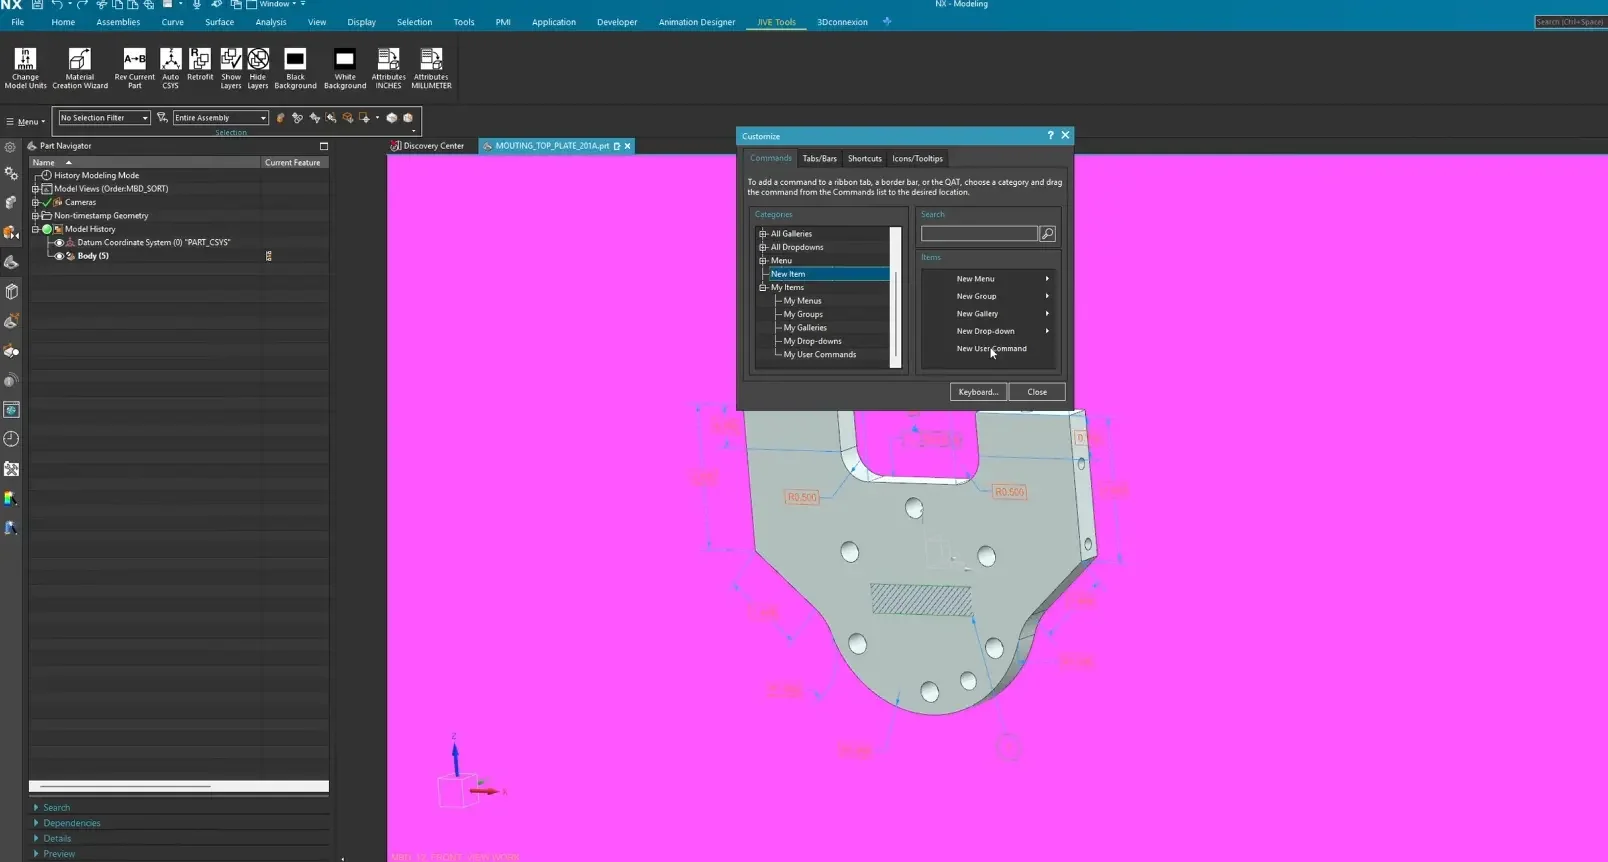
Right-click any empty blue space on the top ribbon bar and select Customize at the bottom of the menu (or press Ctrl + 1).
Creating a Tab: Click the + (Plus) button under the Ribbon Tabs list to build a custom tab (e.g., Jive Tools).
Adding a Command: In the Customize dialog box, scroll down the left-hand category menu and select New Item.
Drag the New User Command item out of the menu box and drop it directly onto your custom ribbon tab space.
Right-click your new button icon, select Rename, type in a descriptive label (e.g., Pink Background), and press Enter.
Step 4: Link the Journal Script to the Button Action
With the button positioned on your ribbon, we must tell NX what code to run when clicked.
Right-click your new ribbon button while still inside the Customize panel.
(Optional) Select Change Button Icon to assign a custom .bmp graphic asset or built-in icon.
Select Edit Action.
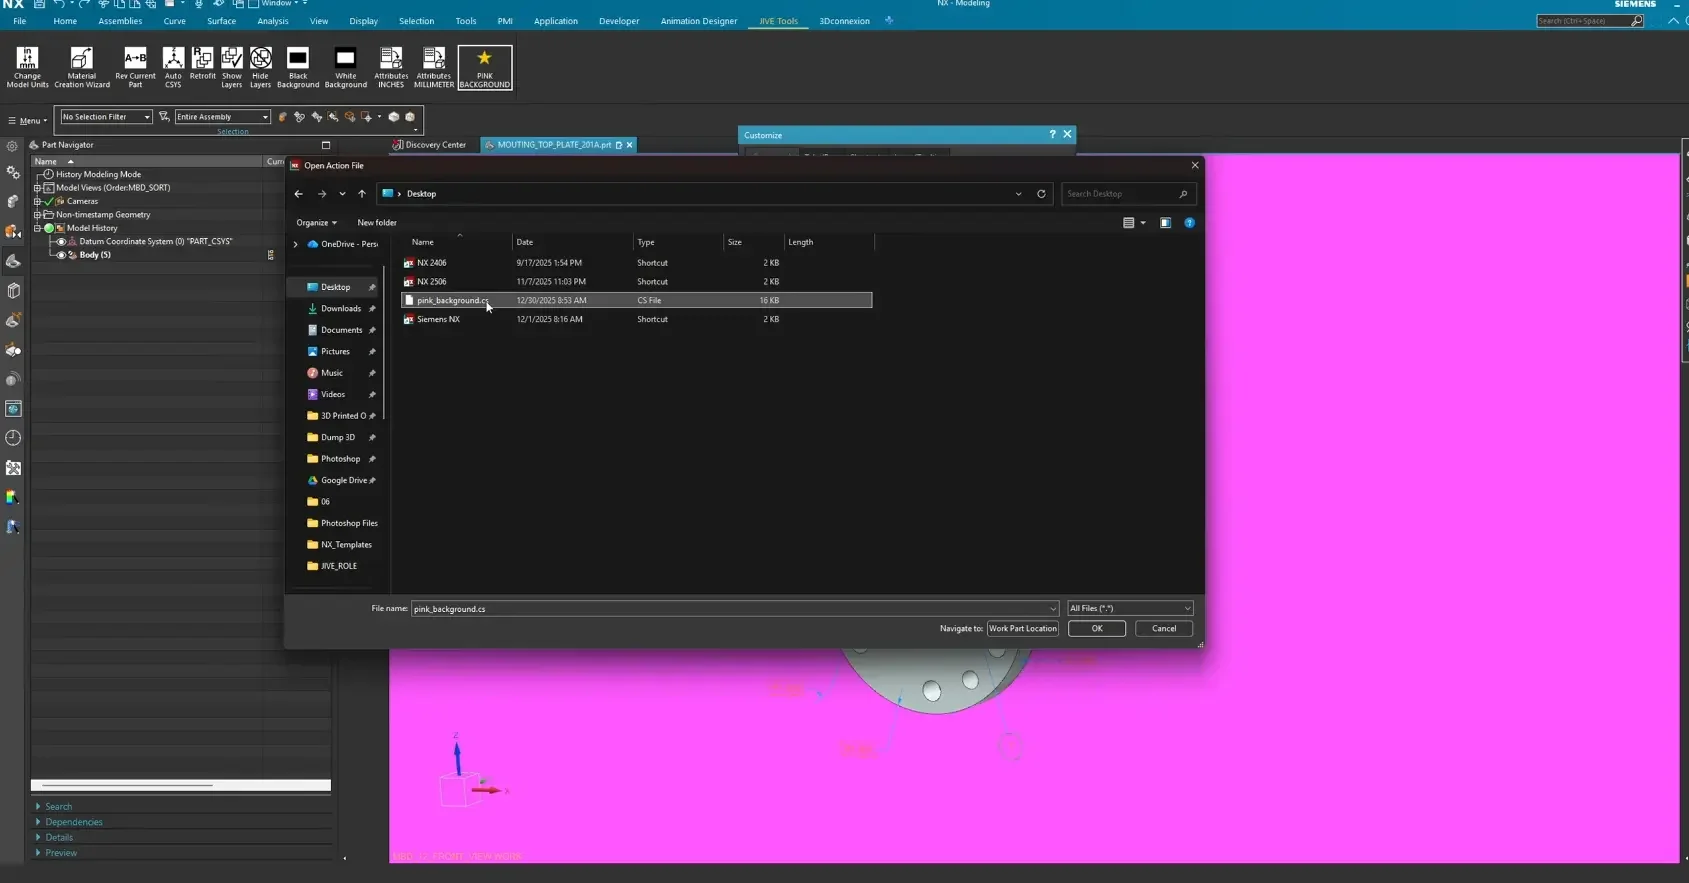
In the Edit Action panel, set the Type to Execute an Action and click Browse.
Change the file extension dropdown filter to All Files (.), locate your saved script (e.g., pink_background.cs), and click OK.
In the Button Message Text input field, type your custom hover-hint text (e.g., "This will turn the background pink").
Click OK and close the Customize dialog box.
Your custom button is now fully functional! Hovering over the icon will reveal your tooltip message, and clicking it will execute your journal instantly.
Step 5: Exporting and Deploying Custom Roles Across Your Team
If you close NX now, your custom button will remain on your local machine. However, if you want to deploy this custom toolbar across your engineering team or back it up for future deployment builds, you need to save your Role.
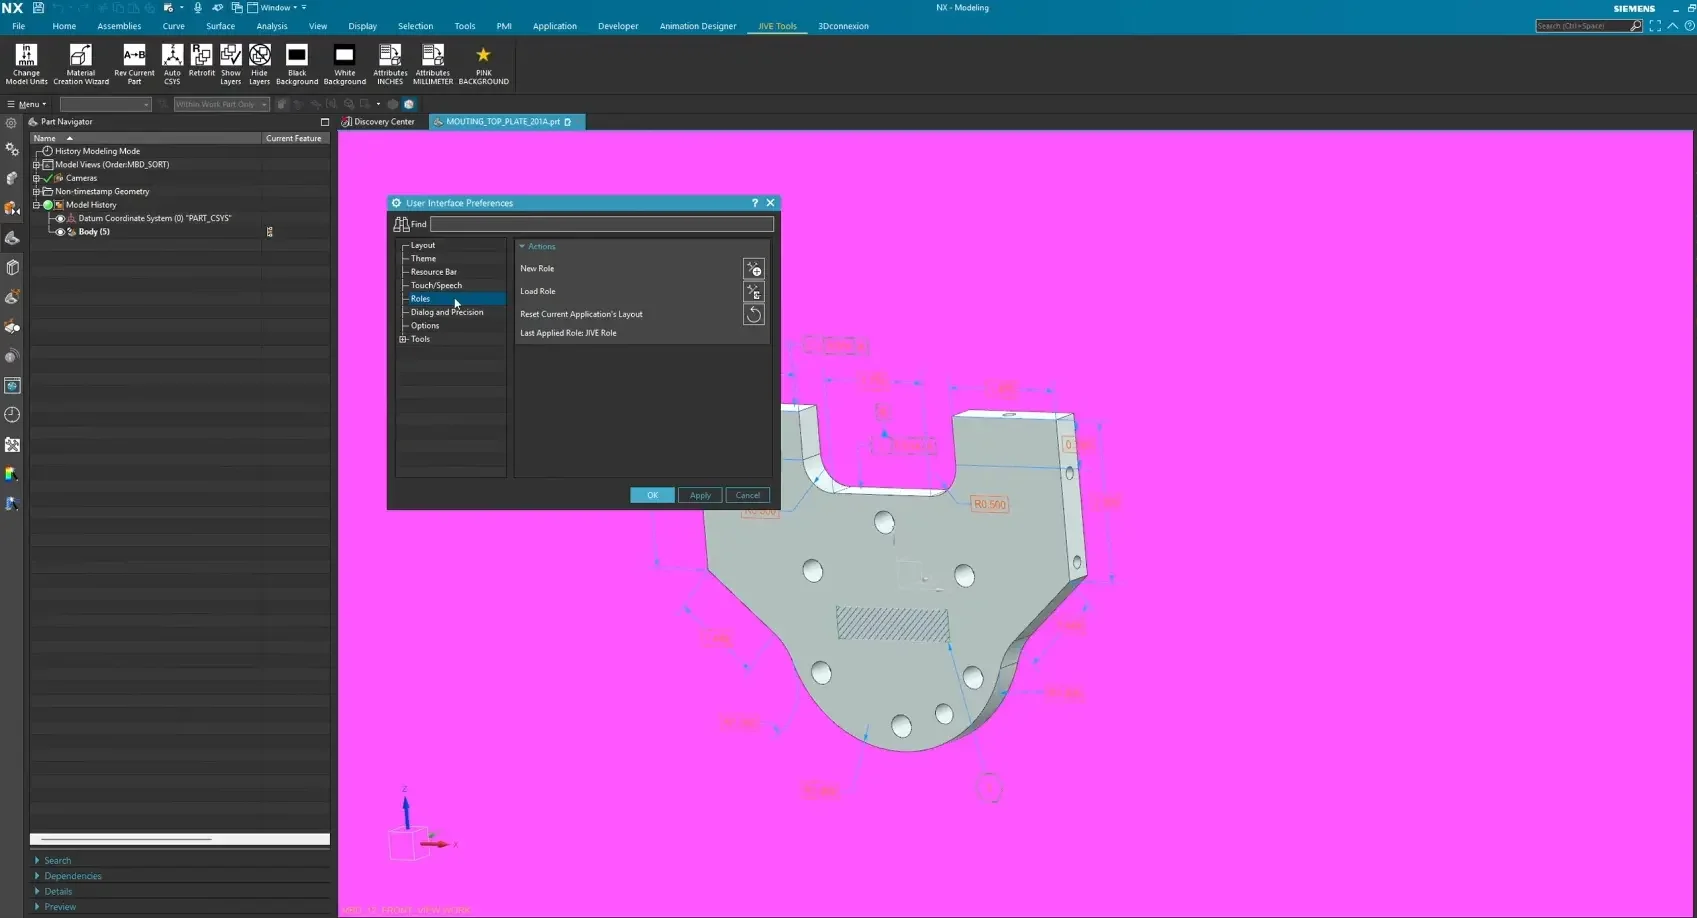
Navigate to Menu > User Interface.
Go to the Roles section.
Click New Role, assign a file name, and export the .mtx role file.
When other engineers load this .mtx file onto their local NX installations, your custom tab, buttons, and linked journal actions will automatically populate on their screens.
Pro Tip for Finding Advanced Scripts: You don't have to write all your code from scratch! Communities like NXJournaling.com host hundreds of free, open-source scripts written by experienced CAD developers that you can download and bind straight to custom ribbon buttons using this exact method.
Next Steps: Scale Your Siemens NX Automation
Now that you know how to record, edit, and run journals to eliminate repetitive CAD tasks, take your automation and scripting knowledge to the next level with our complementary guides:
Build Custom Interfaces: Learn how to build top down designs with our Wave Geometry Linker Tutorial for Assemblies.
Streamline Model Preparation: Discover how to combine journals with parametric rules by checking out our guide on Automating NX Part Families and Expressions.
Scale These Workflows Across Your Engineering Team
Standard software tutorials only go so far when facing unique, real-world production bottlenecks. If your design team is struggling with workflow inefficiencies, modeling errors, or assembly instability, we can help.
At JIVE Engineering, we provide specialized, bespoke Corporate Engineering & CAD Training customized entirely around your company’s native production files and internal design standards. We move your team past basic button-clicking and equip them to build robust, failure-proof modeling workflows that save hours of engineering time.
Explore Our Custom Training Programs or Contact Our Team today to discuss your team's specific training needs.